
How to connect LCD Display on the Arduino using only 2 pins


Generally for connecting an LCD display to an Arduino using 7 strands, it usually breaks the leg that has any projects that remain few ports to be used. But there is a way, using an IC 74LS164 (8-bit serial shift register), a resistor and a diode, but it's not just hardware, you have to use a library.

This Arduino library for connection of 2-wire or 3-wire using HD44780 compatible LCD display via shiftregisters. This circuit is considered "deprecated", but it's worth testing.

LCD Display on the Arduino Circuit 
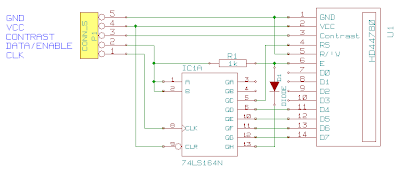
LCD Display on the Arduino


Comments

Popular posts from this blog

A basic Arduino Solar PV Monitor

I have just recently had solar pv installed, mainly to future proof my energy costs, I do not expect it to be like drilling for oil in my back garden, however the return looks to be encouraging. The install gives you another single unit meter, from this you will see the total amount the panels produce, but that is about it. I wanted to know how much the production was as it was happening, I discovered the light blinks on the front of the meter will flash 1000 times for each kWh of electricity which passes through. The rate of the flashing of the LED tells you how much power is currently passing through the meter. [ ]

Schematic Audio Amplifier with IC AN7102S

This Schematic use IC AN7102S , this is setereo amplifier and have output speaker 7,5 mW with impedance 32 Ohm . Supply need 1Volt to 3 Volt , wow this amplifier low voltage. You can use this amplifier on radio is use battery . With just one battery with voltage 1,5 Volt you can play this amplifier. See this Schematic below : Click to Enlarge Datasheet IC AN7102S Vcc                   =  1-3 V Pout                 = 2X 7,5 mW RL                    = 32 Ohm Ft                      = 20hz - 20Khz Icco                  = 7 mA Package         = DIP-18 Manufactered = MATSUSHITA