
How to build Fading Red Eyes


Two Light Emitting Diodes slowly light up and fade away due to the circuitry, giving it a feel of blinking red eyes in darkness.
It is the perfect way to set up your own horror show in Halloween. It can also be installed in series for the Christmas tree or during Diwali or a decorative power indicator for the daily appliance.

A 3 volt linear wave is generated at Pin 1 via LM 1458 IC and followed by a transistor which buffers the emission. A 47 K resistance coupled with a 22uF capacitor is joined at Pin2 to limit the frequency to 0.5Hz. The rate can be varied using a 100K pot(potentiometer) replacing the 47K resistor.

Two operational amplifiers govern the circuit. The transitional voltage is produced by the first op-amp which slowly modulates voltage between 3 to 6 volts. The second op-amp supplies alternating voltage of 2 and 7 volts to charge the capacitor and discharge it via constant current.

Two 47K resistors establish a fixed voltage when joined across Pin 3 & 6 to keep the reference voltage constant. One op-amp works as an inverted amplifier connecting a capacitor across Output Pin 1 and Pin 2 which inverts the output. One of the op-amp compares the voltage to regulate the output in Pin 7. The reference voltage needs to be lower than the input at one point and needs to be higher with the reference at the higher end. A 100K resistance provides a positive feedback and controls the switching point via a capacitor that changes the direction of current. The op-amp also changes its directional output. The triangular waveform at Pin 1 is achieved which moves up or down keeping input constant at 4.5 Volts.

The Point when the LEDs go off can be adjusted by altering the resistance value across Pin 3 and grounding Pin 6. Using a 9 Volt Battery will ensure long operational hours.

Please note that LEDs have a narrow viewing angle of 30 degrees and appears brightest if viewed directly from the front or it might loose the desired effect of the eerie feeling it can generate.


Circuit diagram
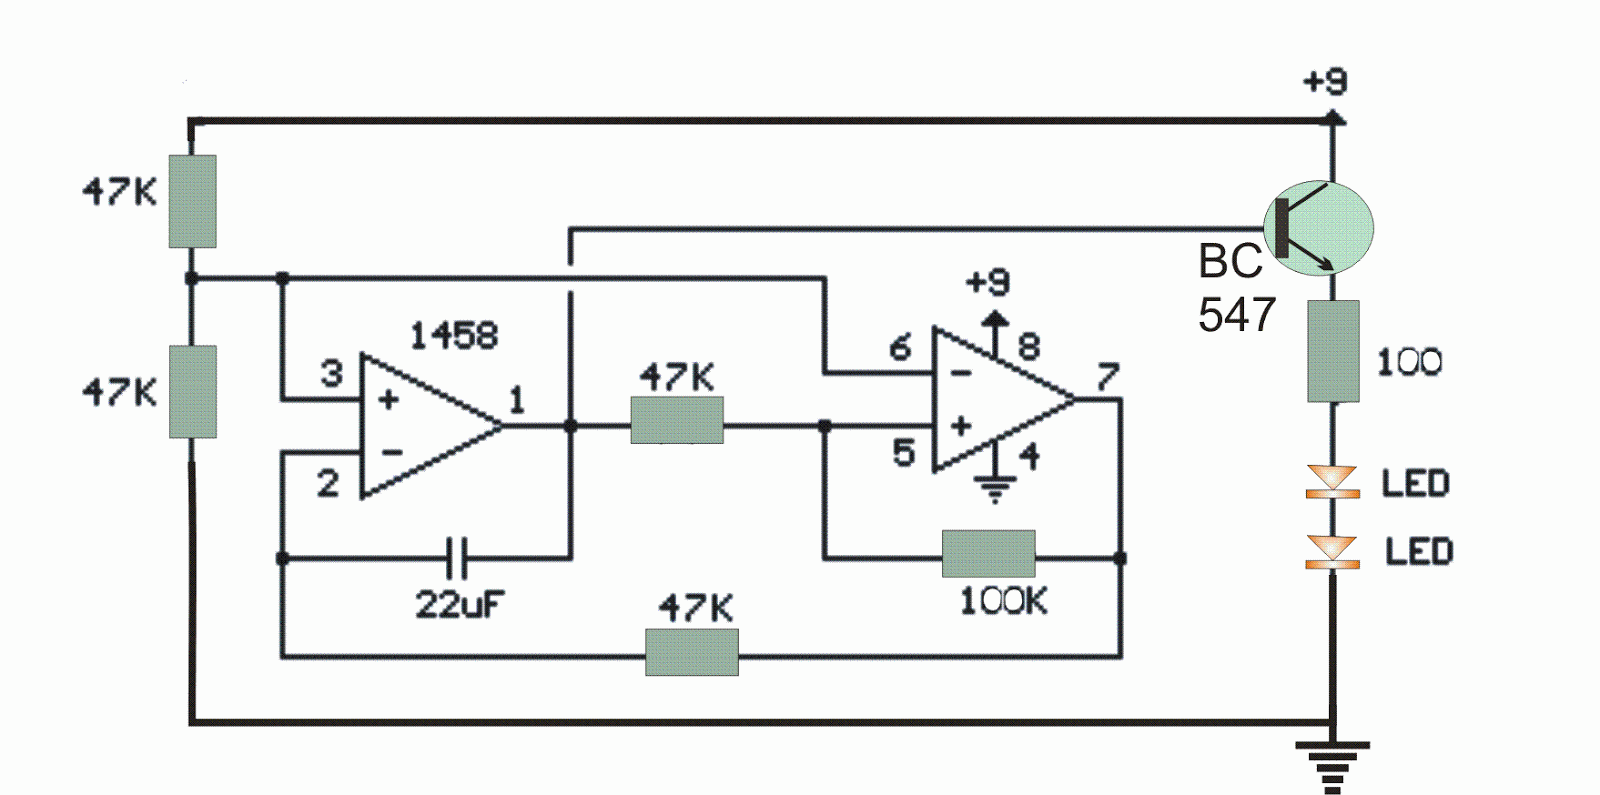

How to build Fading Red Eyes


The circuit here shows a double pair of LEDs that operate intermittently such that while a pair illuminates, the other pair fades out.

Comments

Popular posts from this blog

3 Channels Audio Splitter Amplifier Circuit Diagram using TL084

This is the schematic diagram of 3 channels audio splitter amplifier circuit which built using op-amp IC TL084. The 3 channels amplifier output distribution applies a single TL084.   3 Channels Audio Splitter Amplifier Circuit Diagram The very first step is to capacitive coupling having a p. 1.0 ~ electrolytic capacitor. The entries are railways Vee Y2 or 4.5 V. This enables working with an individual 9V power source. A voltage gain of 10 (1 M?/100 Kohm) is obtained in the first stage, as well as the other three floors are connected as a unity gain voltage followers. Every single output stage drives independently through an amplifier output 50 pF capacitor towards the resistance of 5.1 k ohm load. The response range is flat from 10 Hz to 30 kHz.

Simple But Automatic Load Sensing Power Switch

This circuit will automatically switch on several mains-powered "slave" loads when a "master" load is turned on. For example, it will switch on the amplifier and CD player in a stereo system when the receiver is turned on. It works by sensing the current draw of the "master" device through a low value high wattage resistor using a comparator. The output of that comparator then switches on the "slave" relay. The circuit can be built into a power bar, extension cord or power center to provide a convenient set of "smart" outlets that switch on when the master appliance is powered (turn on the computer monitor and the computer, printer and other peripherals come on as well). Automatic Load Sensing Power Switch Circuit Diagram Parts List: Notes: This circuit is designed for 120V operation. For 240V operation, resistors R2 and R6 will need to be changed. A maximum of 5A can be used as the master unless the wattage of R1 is increased S1 provid...

RF amplifier protection

RF amplifier protection I have developed the protection circuit for the EB104 amplifier I am working on, after I finally had some time to design and test a few models. The main requirements have been: - protection in case of high temperature; - protection in case of high SWR; - protection in case of wrong output filter selection; - simple design (i’m a fan of the whole K.I.S.S. rule of thought), able to work in strong electromagnetic fields, reliable, inexpensive. Because i will be using the same directional coupler i have used in the SWR meter (the one made on PCB) wich is directly influenced by the signal frequency, and because i want full HF coverage, i cannot just measure the reflected signal and make a circuit cut the amplifier when it goes over a limit; on 28Mhz the coupler generates roughly 4 times more voltage that let’s say in 7Mhz. So a system that compares direct and reflected signal and triggers when the latter is percentually too high was needed, therefore an operational a...